Saturday, May 31, 2014
Ball FreshTECH Jam and Jelly maker reviewed.
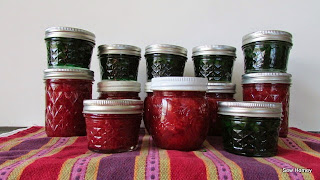
Wow, what a great little appliance this thing is. I made 8 1/2 pints of Strawberry Jam and 6 4 oz jars of Pepper Jelly today. After you get the fruit prepped it is just 21 minutes until the jam is ready to go in the hot water bath for processing. 10 minutes in there at a low boil, turn off the flame, sit 5 minutes in the hot water, remove the jars and wait for the anticipated ping to sound. That sound of course signals that your jars have sealed. They all pinged almost immediately much to my delight. So here are some pictures...this first one shows the fruit in the Jam and Jelly maker as it is being cooked. It looks like it going really fast but it was not...no fruit was hurled into space while I had the lid off. ;-)
This is what it looked like when it was completely finished cooking
and tada, the fruits of my labor
I followed the recipes that came with the Jam and Jelly maker they worked well, no problems. Some people have had the experience of Hot Pepper Jelly not setting, (me included a few years ago). This recipe set up very nicely. I did add some green food coloring because with out it the jam would have been a very pale green. The Hubs planted some bell pepper plants in the garden so when they are ripe I'll be able to use those instead of store bought. My past experience was that the home grown peppers ripe off of the vine did not need any added color. Next time I will also leave in some of the jalapeno seeds as I really like it to be a bit spicy. All in all, I am very pleased. Thought I'd provide a couple of recipes that you could make using Hot Pepper Jelly. I'm totally going to make the hot pepper cheese thumbprints. Imagine these at Christmas time on your appetizer tray with red and green jelly in the middle. YUM!!
Cheesy Thumbprint Appetizers with Hot Pepper Jelly
2 cups shredded Cheddar cheese
1 cup all-purpose flour
6 tablespoons chilled butter, chopped
1/2 cup hot pepper jelly
Directions
1. Blend Cheddar cheese, flour, and butter in a food processor until dough is a coarse-meal texture and forms into a ball. Wrap dough in plastic wrap and refrigerate for 30 minutes.
2. Preheat oven to 400 degrees F (200 degrees C).
3. Shape dough into 1 1/2-inch balls and place 1 inch apart on a baking sheet.
4. Bake in the preheated oven for 5 minutes. Remove from oven; press thumb into top of each ball, creating an indentation. Spoon about 1 teaspoon pepper jelly into indentation. Bake until edges are golden brown, about 5 minutes.
From Allrecipes.com
And here is a great sounding Pork Recipe
From Southern Living Magazine
Pork Chops with Pepper Jelly Sauce
4 (3/4-inch-thick) bone-in pork loin chops (about 2 1/4 lb.)
1 teaspoon salt
3/4 teaspoon freshly ground pepper
3 tablespoons butter, divided
3 tablespoons olive oil
1 tablespoon all-purpose flour
1 large jalapeño pepper, seeded and minced
1/3 cup dry white wine
1 cup chicken broth
1/2 cup red pepper jelly
1. Sprinkle pork with salt and pepper. Melt 1 Tbsp. butter with oil in a 12-inch cast-iron skillet over medium-high heat. Add pork chops, and cook 8 minutes; turn and cook 10 minutes or until a meat thermometer inserted into thickest portion registers 150°. Remove from skillet, and keep warm.
2. Add flour and jalapeño to skillet. Cook, stirring constantly, 1 to 2 minutes or until flour is golden brown. Add wine, stirring to loosen particles from bottom of skillet; cook 1 minute or until almost completely reduced.
3. Add chicken broth, and cook 2 to 3 minutes or until mixture begins to thicken. Whisk in pepper jelly until melted and smooth. Cook 3 to 4 minutes or until thickened. Remove from heat. Stir in remaining 2 Tbsp. butter. Season with salt and freshly ground pepper to taste. Return pork to skillet; turn to coat. Serve pork with sauce.
Yield: Makes 6 servings
Thanks to http://www.nibblemethis.com/
Subscribe to:
Post Comments (Atom)


The jelly maker sounds amazing! And what a wonderful recipe and idea for the holiday season indeed!
ReplyDelete